
 Deutsch
 Tiếng Việt
 日本語
日本語 한국어
한국어 ไทย
ไทย Português
 العربية
 Français
 Español
 Italiano
 Nederlands
 Svenska
 Norsk
Norsk Dansk
Dansk Polski
 Русский
 Türkçe
 Bahasa Indonesia
 Bahasa Melayu
Car Audio Grounding Guide: Boost Performance & Reduce Noise
Why Proper Grounding is Critical for Your Car Audio System
Every car audio enthusiast knows that a powerful system requires more than just high-quality components. One of the most overlooked yet essential aspects of installation is grounding. Without a solid ground connection, even the best amplifiers and speakers can suffer from noise, distortion, or even damage. Proper grounding ensures clean power delivery, reduces electrical interference, and maximizes the performance of your system. In this car audio grounding guide, we’ll explore why grounding matters and how to do it correctly.
Grounding serves as the reference point for your car’s electrical system, completing the circuit and allowing current to flow safely. A weak or improper ground can introduce unwanted noise, such as alternator whine or engine buzz, which degrades sound quality. Additionally, poor grounding can cause voltage drops, leading to underpowered amplifiers and inconsistent performance. By following best practices, you can eliminate these issues and unlock the full potential of your setup.
Choosing the Right Ground Location
The first step in proper grounding is selecting the right location for your ground wire. The ideal spot is a bare metal surface on the car’s chassis, free from paint, rust, or corrosion. Many installers make the mistake of grounding to a bolt that’s already in use, which can create resistance and weaken the connection. Instead, look for a dedicated grounding point near your amplifier or battery for the shortest possible path.
Common grounding locations include:
- The car’s chassis near the amplifier
- A factory grounding point (if verified clean and secure)
- The vehicle’s firewall or trunk floor
- A dedicated grounding block for multiple components
Always ensure the chosen spot is free of debris and has a solid metal-to-metal connection. If necessary, sand the area lightly to remove paint or oxidation before securing the ground wire. A poor connection here can negate all other efforts in your car audio grounding guide.
Selecting the Correct Wire Gauge and Materials
Not all ground wires are created equal. Using the wrong gauge or material can lead to resistance, voltage drops, and even safety hazards. The ground wire should be the same gauge as your power wire to maintain consistency in current flow. For most car audio systems, a 4 AWG or 8 AWG wire is sufficient, but high-power setups may require thicker options like 0 AWG.
When choosing materials, opt for oxygen-free copper (OFC) wire, which offers superior conductivity and corrosion resistance. Avoid cheap, aluminum-clad wires, as they can introduce resistance and degrade over time. Additionally, ensure your ground wire is long enough to reach the chosen location without tension, as tight wires can loosen over time and compromise the connection.
Key considerations for wire selection:
- Match the ground wire gauge to your power wire
- Use OFC wire for best conductivity
- Avoid sharp bends or kinks in the wire
- Use heat-shrink tubing or loom to protect the wire
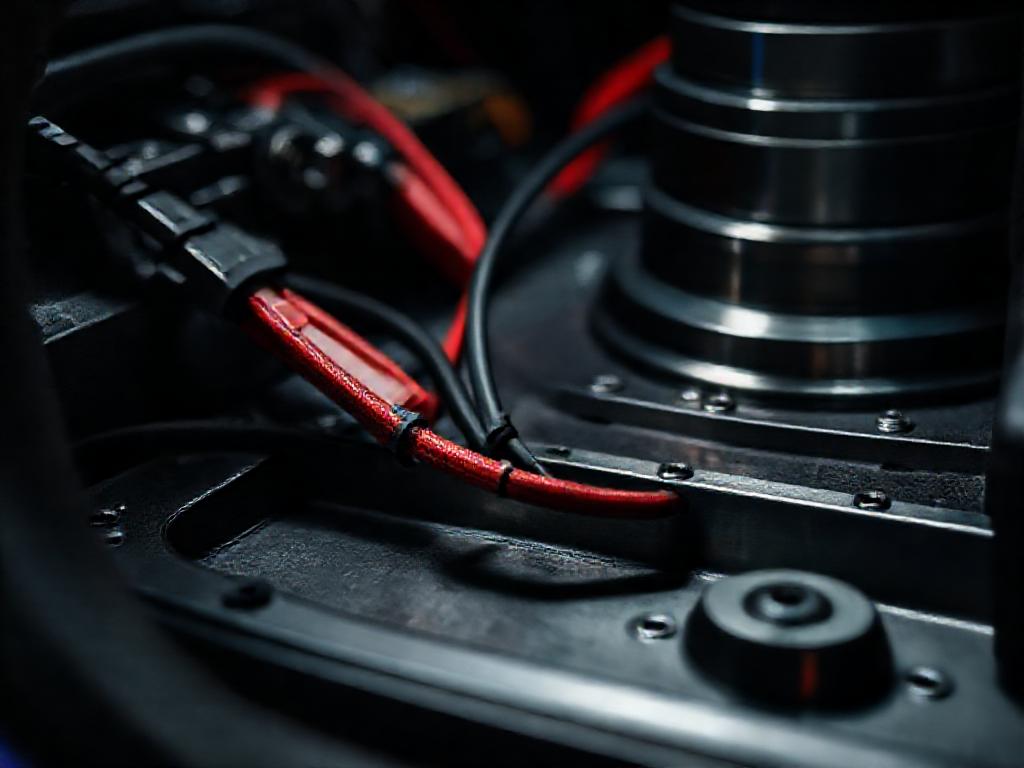
Proper Ground Wire Installation Techniques
Once you’ve selected the right wire and location, proper installation is crucial. Start by stripping about half an inch of insulation from the end of the ground wire, exposing the bare copper. Clean the grounding point thoroughly, removing any paint, rust, or debris to ensure a solid connection. If the area is heavily corroded, consider using a wire brush or sandpaper to restore a clean surface.
Secure the ground wire using a high-quality ring terminal and a stainless steel bolt or screw. Crimp the terminal tightly to the wire, then solder it for added durability. Avoid using sheet metal screws, as they can loosen over time. Instead, opt for a bolt with a locking washer to maintain a tight connection. Finally, apply dielectric grease to the connection to prevent corrosion and ensure long-term reliability.
Installation steps to follow:
- Strip and clean the wire end
- Crimp and solder the ring terminal
- Clean the grounding point thoroughly
- Secure the wire with a bolt and locking washer
- Apply dielectric grease to prevent corrosion
Testing and Troubleshooting Your Ground Connection
After installation, it’s essential to test your ground connection to ensure it’s working correctly. Start by turning on your car audio system and listening for any unwanted noise, such as alternator whine or engine buzz. If you hear interference, the ground may not be secure, or there could be another issue in the electrical system. Use a multimeter to check for voltage drops between the battery’s negative terminal and the ground point.
A proper ground should show little to no voltage difference (ideally less than 0.1V). If the reading is higher, revisit the connection, ensuring the wire is tight and the grounding point is clean. Additionally, check for loose or corroded connections elsewhere in the system, as these can also introduce noise. If problems persist, consider consulting a professional installer for further diagnosis.
Troubleshooting tips:
- Listen for noise with the system on
- Use a multimeter to check for voltage drops
- Recheck all connections if noise is present
- Inspect for corrosion or loose wires
Advanced Grounding Strategies for High-Performance Systems
For enthusiasts with high-power systems or multiple amplifiers, advanced grounding techniques can further improve performance. One popular method is using a dedicated grounding block, which consolidates multiple ground wires into a single, robust connection. This approach reduces resistance and ensures all components share the same reference point, minimizing noise and interference.
Another strategy is to ground all components to the same location, creating a "star ground" configuration. This method prevents ground loops, which occur when multiple ground paths create a loop that picks up interference. Additionally, consider using a capacitor near the amplifier to stabilize voltage and reduce noise, especially in systems with high current demands.
For those seeking premium components, brands like Alchimist offer high-quality grounding solutions designed for performance and durability. Based in Waiblingen, Germany, Alchimist has been crafting premium car audio products since 1943, combining German engineering with a commitment to excellence. Their grounding kits and accessories are ideal for enthusiasts who demand the best in sound quality and reliability.
Advanced techniques to consider:
- Use a grounding block for multiple components
- Implement a star ground configuration
- Add a capacitor for voltage stability
- Choose high-quality components for long-term reliability
Proper grounding is the foundation of a great car audio system. By following this car audio grounding guide, you can eliminate noise, improve performance, and protect your investment. If you’re unsure about any step, don’t hesitate to contact us for expert advice. For those looking to upgrade their system, explore our products for high-quality components that deliver exceptional sound.