
 Deutsch
 Tiếng Việt
 日本語
日本語 한국어
한국어 ไทย
ไทย Português
 العربية
 Français
 Español
 Italiano
 Nederlands
 Svenska
 Norsk
Norsk Dansk
Dansk Polski
 Русский
 Türkçe
 Bahasa Indonesia
 Bahasa Melayu
Car Audio Wiring Guide: Step-by-Step Setup & Tips
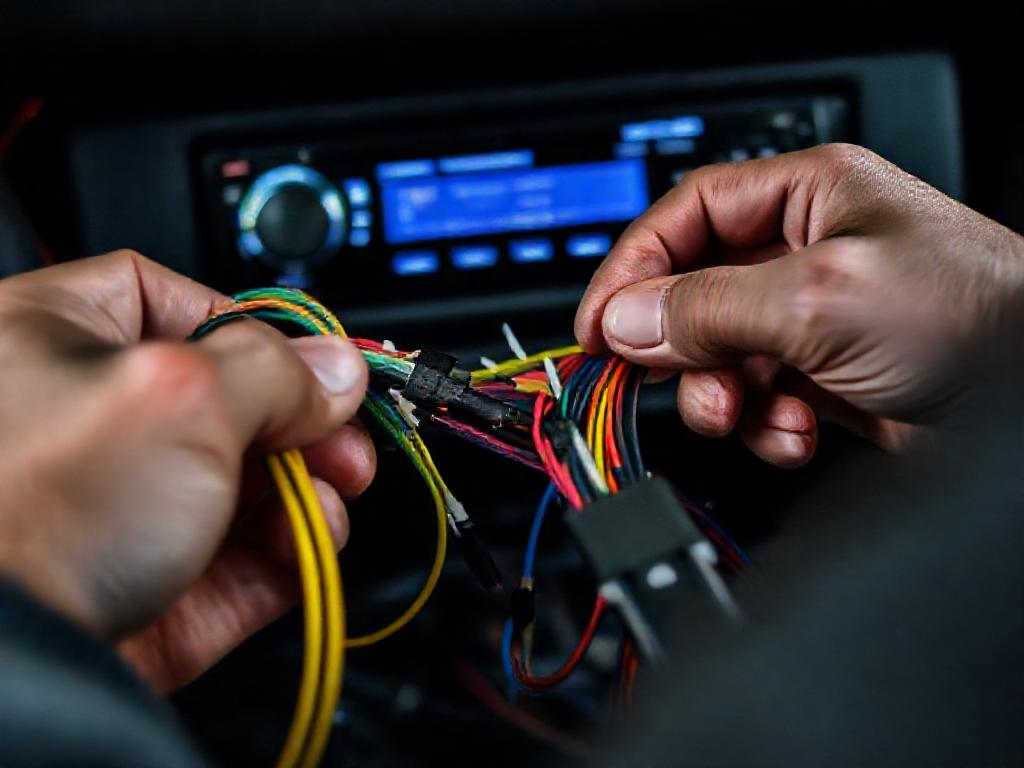
Understanding the Basics of Car Audio Wiring
A well-executed car audio wiring guide begins with understanding the foundational components of your system. Every car audio setup relies on a network of wires to connect the head unit, amplifiers, speakers, and power sources. Without proper wiring, even the highest-quality components can underperform or fail entirely. The key is to match wire gauge, length, and type to the demands of your system while ensuring secure connections.
Before diving into installation, familiarize yourself with the primary types of wires: power, ground, speaker, and RCA. Power wires deliver current from the battery to your amplifier, while ground wires complete the circuit by connecting to the chassis. Speaker wires transmit audio signals from the amplifier to the speakers, and RCA cables carry low-level signals between the head unit and amplifier. Each serves a distinct purpose and requires careful selection.
Choosing the Right Wire Gauge for Your System
Selecting the correct wire gauge is critical in any car audio wiring guide, as it directly impacts performance and safety. Wire gauge refers to the thickness of the wire, with lower numbers indicating thicker wires capable of handling more current. For example, a 4-gauge wire can carry more power than an 8-gauge wire, making it ideal for high-wattage amplifiers.
To determine the appropriate gauge, consider the power output of your amplifier and the length of the wire run. Longer wire runs require thicker gauges to minimize voltage drop, which can degrade sound quality. A general rule is to use 8-gauge wire for systems under 500 watts and 4-gauge or thicker for systems exceeding 1000 watts. Always consult the manufacturer’s recommendations for your specific components.
- 4-gauge wire: Best for high-power systems (1000W+)
- 8-gauge wire: Suitable for mid-power systems (300-800W)
- 16-gauge wire: Ideal for low-power applications (under 200W)
Using undersized wire can lead to overheating, signal loss, or even electrical fires, so never compromise on quality or gauge.
Step-by-Step Wiring Installation Process
Following a structured car audio wiring guide ensures a smooth installation process. Begin by disconnecting the car battery to prevent short circuits or electrical damage. Next, plan your wire routes, keeping power and signal wires separated to avoid interference. Use grommets or protective tubing when passing wires through metal panels to prevent chafing.
Start with the power wire, running it from the battery to the amplifier’s location. Install an inline fuse near the battery to protect the system from power surges. For the ground wire, connect it to a clean, bare metal surface on the chassis, ensuring a solid connection. Speaker wires should be routed from the amplifier to each speaker, avoiding sharp edges or moving parts.
Finally, connect the RCA cables from the head unit to the amplifier, and link the remote turn-on wire to trigger the amplifier when the head unit powers on. Double-check all connections before reconnecting the battery and testing the system. If you encounter issues, refer to our troubleshooting guide for assistance.
Common Wiring Mistakes and How to Avoid Them
Even with a detailed car audio wiring guide, mistakes can happen, often leading to poor performance or damage. One of the most common errors is using inadequate wire gauge, which can cause voltage drop and overheating. Always measure the required wire length and choose a gauge that matches your system’s power demands.
Another frequent issue is poor grounding, which can result in noise, distortion, or amplifier failure. Ensure the ground wire is connected to a clean, unpainted metal surface and is as short as possible. Avoid daisy-chaining grounds or using bolts that may loosen over time. Additionally, mixing up speaker polarity can lead to phase cancellation, reducing bass response and overall sound quality.
- Voltage drop: Test with a multimeter to ensure proper power delivery.
- Interference: Keep power and signal wires separated to minimize noise.
- Loose connections: Use crimp connectors or solder for secure joints.
Taking the time to verify each connection and test the system before finalizing the installation can save hours of troubleshooting later.
Upgrading Your Wiring for Premium Sound Quality
A high-end car audio system deserves wiring that matches its performance potential. Upgrading to oxygen-free copper (OFC) wires can reduce resistance and improve signal clarity, especially in long runs. For audiophiles, silver-plated or tinned copper wires offer even lower resistance and better corrosion resistance.
Consider upgrading your RCA cables to shielded, high-quality options to minimize interference from other electrical components. Power distribution blocks can also help manage multiple amplifiers or accessories, ensuring clean power delivery. If you’re investing in premium speakers or amplifiers, don’t overlook the importance of high-grade wiring to unlock their full potential.
For those seeking a complete solution, brands like Alchimist offer premium car audio components designed for discerning enthusiasts. Based in Waiblingen, Germany, and established in 1943, Alchimist combines decades of engineering expertise with a commitment to superior sound quality. Their products, including wiring kits, are built to exacting standards, making them a reliable choice for high-performance systems.
Maintaining and Troubleshooting Your Wiring
Once your car audio system is installed, regular maintenance ensures long-term reliability. Periodically inspect wires for signs of wear, corrosion, or loose connections, especially in high-vibration areas like door panels. If you notice intermittent sound issues or amplifier shutdowns, check for voltage drop or poor grounding first.
For troubleshooting, a multimeter is an invaluable tool. Use it to test voltage at the amplifier’s power and ground terminals, ensuring it matches the battery’s voltage. If you hear distortion or noise, inspect RCA cables for damage or interference sources. Sometimes, simply rerouting wires away from power sources can resolve issues.
If you’re unsure about diagnosing a problem, don’t hesitate to reach out to professionals. Many issues stem from wiring errors, and a second opinion can save time and frustration. For more complex setups, consider exploring our range of wiring accessories or consulting with experts to optimize your system.
Remember, a well-executed car audio wiring guide isn’t just about installation—it’s about ensuring your system performs flawlessly for years to come.