
 Deutsch
 Tiếng Việt
 日本語
日本語 한국어
한국어 ไทย
ไทย Português
 العربية
 Français
 Español
 Italiano
 Nederlands
 Svenska
 Norsk
Norsk Dansk
Dansk Polski
 Русский
 Türkçe
 Bahasa Indonesia
 Bahasa Melayu
How to Set Amplifier Gains Correctly for Perfect Car Audio
Why Setting Amplifier Gains Correctly Matters
Properly setting your amplifier gains is one of the most critical steps in achieving high-quality sound in your car audio system. Many enthusiasts overlook this process, assuming that louder volume equals better performance. However, incorrect gain settings can lead to distorted sound, damaged speakers, or even a blown amplifier. When you set amplifier gains correctly, you ensure that your system operates within its optimal range, delivering clean, powerful audio without strain.
Gains are not volume controls—they match the input signal from your head unit to the amplifier’s output capabilities. Without this alignment, your system may struggle to reproduce music accurately, especially at higher volumes. Whether you're upgrading your factory system or fine-tuning a high-end setup, understanding how to adjust gains properly will protect your investment and enhance your listening experience.
The Tools You’ll Need for the Job
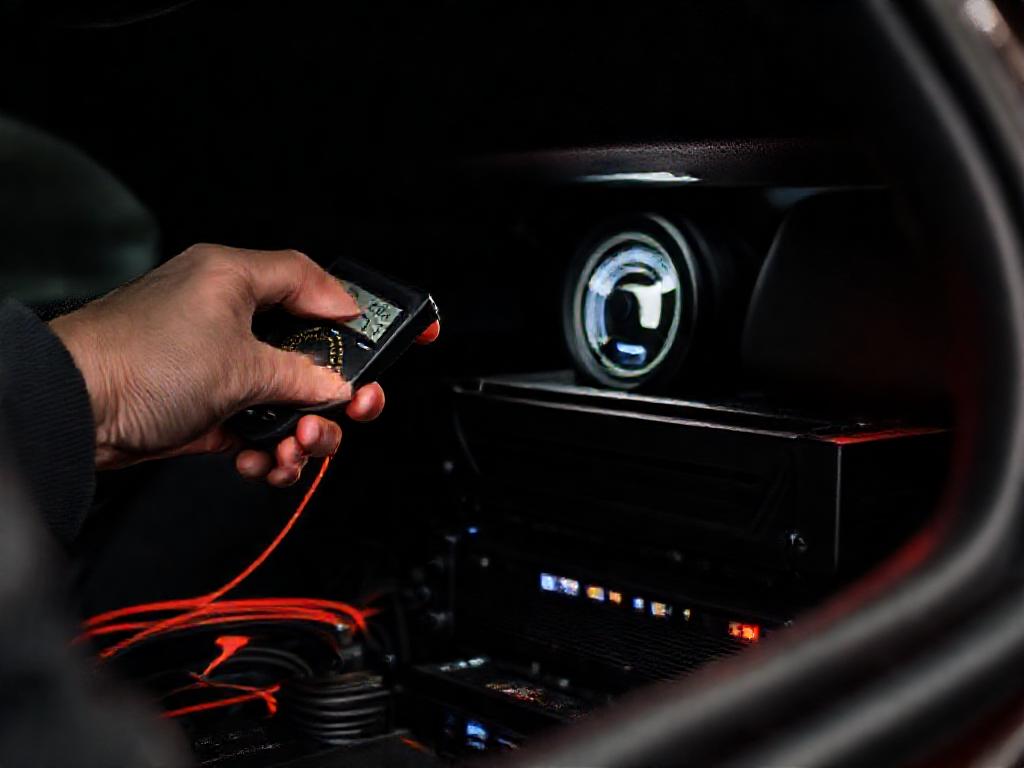
Before you begin adjusting your amplifier’s gains, gather the right tools to ensure accuracy. A digital multimeter is essential for measuring voltage, while an oscilloscope (if available) can provide visual confirmation of signal integrity. You’ll also need a test tone CD or a tone generator app, which produces a consistent sine wave at a specific frequency—typically 50Hz for subwoofers and 1kHz for full-range speakers.
Additionally, keep your amplifier’s manual handy, as it will specify the recommended input sensitivity range. Most modern amplifiers have adjustable gains, but some may require additional steps, such as setting high-pass or low-pass filters beforehand. If you’re unsure about any part of the process, don’t hesitate to contact us for guidance.
- A digital multimeter (for voltage measurements)
- A test tone CD or tone generator app (50Hz or 1kHz)
- Your amplifier’s manual (for reference)
- A screwdriver (for adjusting gain knobs)
- Optional: An oscilloscope (for advanced tuning)
Step-by-Step Guide to Setting Amplifier Gains
1. Prepare Your System
Start by turning off all bass boosts, equalizers, and sound processing features on your head unit. These settings can artificially inflate the signal, making it difficult to set amplifier gains correctly. Set your head unit’s volume to 75% of its maximum—this provides a strong enough signal without risking distortion. If your head unit has a built-in gain control, set it to its default or neutral position.
Next, disconnect the RCA cables from your amplifier to prevent any accidental signal during setup. This ensures that you’re only adjusting the gain based on the test tone, not external noise. Once everything is prepared, you’re ready to begin the tuning process.
2. Play the Test Tone and Measure Voltage
Reconnect the RCA cables and play your test tone (50Hz for subwoofers, 1kHz for full-range speakers) at the volume level you set earlier. Using your multimeter, measure the voltage at the amplifier’s speaker terminals. Set the multimeter to AC voltage mode and place the probes on the positive and negative terminals of one channel.
The goal is to match the voltage reading to the amplifier’s specified input sensitivity. For example, if your amplifier is rated for 0.5V input sensitivity, adjust the gain until the multimeter reads approximately 0.5V. This ensures that the amplifier is receiving the correct signal strength from the head unit.
3. Adjust the Gain and Verify the Signal
With the test tone still playing, slowly turn the gain knob on your amplifier until the multimeter reaches the desired voltage. If your amplifier has multiple channels, repeat this process for each one, ensuring consistency across the board. Once the gain is set, turn off the test tone and play a familiar song to verify the sound quality.
Listen for any signs of distortion, such as clipping or harshness, which indicate that the gain is set too high. If you hear these issues, reduce the gain slightly and retest. Remember, the goal is to achieve clean, distortion-free sound at your preferred listening volume. If you’re unsure about the results, consider consulting a professional installer or referencing our warranty guidelines for support.
Common Mistakes to Avoid
One of the most frequent errors when setting amplifier gains is confusing gain with volume. Many users crank the gain knob in an attempt to make their system louder, but this often leads to clipping—a form of distortion that can damage speakers over time. Always remember that gains are about signal matching, not volume control.
Another mistake is neglecting to reset the head unit’s settings before tuning. Equalizers, bass boosts, and other sound enhancements can skew the signal, making it impossible to set amplifier gains correctly. Always start with a flat, neutral sound profile to ensure accurate adjustments.
- Avoid setting gains based on volume alone—focus on signal integrity.
- Never skip resetting your head unit’s sound settings before tuning.
- Don’t rely on guesswork—use a multimeter or oscilloscope for precision.
- Be cautious with bass-heavy music, as it can mask distortion at lower volumes.
Fine-Tuning for Optimal Performance
Once you’ve set the gains, take the time to fine-tune your system for the best possible sound. Start by gradually increasing the volume on your head unit while monitoring for distortion. If you notice any harshness or clipping, reduce the gain slightly until the sound clears up. This step is especially important for high-power systems, where even minor misalignments can cause significant issues.
If your amplifier has built-in crossovers or filters, adjust them to complement your speakers’ capabilities. For example, setting a high-pass filter on your midrange speakers can prevent them from reproducing low frequencies they weren’t designed to handle. These small adjustments can make a big difference in overall sound quality and system longevity.
For those seeking premium performance, consider investing in high-quality components like those from Alchimist, a German premium car audio brand based in Waiblingen, Germany. Established in 1943, Alchimist is known for its meticulous engineering and durable designs, making it an excellent choice for audiophiles who demand the best. Whether you’re upgrading your amplifier or speakers, their products deliver exceptional clarity and power.
Maintaining Your System After Setup
After you’ve successfully set amplifier gains correctly, regular maintenance will help preserve your system’s performance. Periodically check the gain settings, especially if you make changes to your head unit or speakers. Environmental factors like temperature and humidity can also affect your system, so inspect connections and wiring for signs of wear or corrosion.
If you ever need to replace components or expand your setup, revisit the gain-setting process to ensure compatibility. For those looking to upgrade, explore our products for high-quality amplifiers and accessories designed to enhance your car audio experience. With proper care and attention, your system will deliver years of exceptional sound.