
 Deutsch
 Tiếng Việt
 日本語
日本語 한국어
한국어 ไทย
ไทย Português
 العربية
 Français
 Español
 Italiano
 Nederlands
 Svenska
 Norsk
Norsk Dansk
Dansk Polski
 Русский
 Türkçe
 Bahasa Indonesia
 Bahasa Melayu
Running Speaker Wire in Your Car: A Safe & Easy Guide
Why Proper Speaker Wire Installation Matters in Your Car
Running speaker wire in your vehicle is more than just connecting points A to B—it’s about ensuring optimal sound quality, safety, and longevity for your car audio system. Poorly installed wiring can lead to signal loss, electrical interference, or even hazards like short circuits. Whether you're upgrading factory speakers or installing a full aftermarket system, taking the time to do it right pays off in performance and peace of mind.
Many enthusiasts underestimate the complexity of running speaker wire car setups, assuming it’s as simple as threading wires through door panels. However, factors like wire gauge, insulation, and routing paths play critical roles in preventing issues down the road. A well-executed installation minimizes distortion, preserves signal integrity, and protects your vehicle’s electrical system from potential damage.
Tools and Materials You’ll Need
Before diving into the installation, gather the right tools and materials to streamline the process. Having everything on hand prevents mid-project frustrations and ensures a professional finish. Here’s a checklist of essentials:
- Speaker wire – Choose the appropriate gauge (typically 16-14 AWG for most car audio applications).
- Wire strippers and crimpers – For clean connections without damaging conductors.
- Electrical tape or heat shrink tubing – To insulate and protect splices.
- Panel removal tools – Plastic pry tools prevent scratches when removing interior trim.
- Fish tape or wire coat hanger – Helps route wires through tight spaces like door jambs.
- Multimeter – For testing continuity and verifying connections.
- Zip ties or wire loom – Keeps wires organized and prevents rattling or chafing.
Investing in quality materials upfront saves time and money. Cheap wire or improper tools can degrade sound quality or create safety risks, so prioritize durability and reliability. If you’re unsure about wire gauge, consult your amplifier or speaker specifications to match the recommended thickness.
Planning Your Wire Route: Key Considerations
Mapping out your wire route before cutting or connecting anything is crucial for a clean, efficient installation. Start by identifying the shortest and safest path between your head unit, amplifier, and speakers. Avoid routing wires near high-heat areas like exhaust components or sharp metal edges that could damage insulation over time.
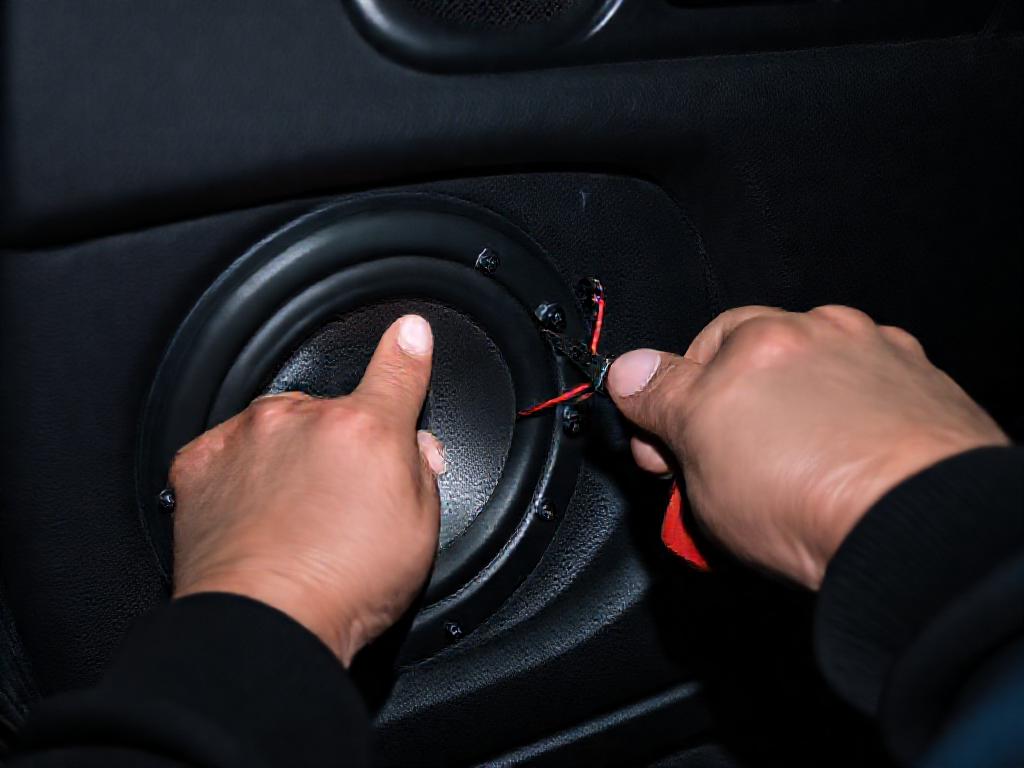
When running speaker wire car systems, pay special attention to door hinges, seat tracks, and firewall pass-throughs. These areas often require extra care to prevent pinched or frayed wires. For example, door speakers typically require wires to pass through a rubber grommet in the door jamb—ensure the grommet is intact to protect the wire from metal edges.
Another critical consideration is separating power and signal wires. Running RCA cables (for amplifiers) parallel to power wires can introduce noise or interference. If possible, route them on opposite sides of the vehicle or use shielded cables to minimize this risk. Planning ahead reduces troubleshooting later and ensures a seamless installation.
Step-by-Step Guide to Running Speaker Wire
With your route planned and tools ready, it’s time to execute the installation. Follow these steps for a safe and effective process:
- Disconnect the battery – Prevents accidental shorts or electrical damage during installation.
- Remove interior panels – Use plastic pry tools to gently pop off door panels, kick panels, or other trim pieces. Store screws and clips in labeled bags to avoid losing them.
- Feed wires through grommets – For door speakers, locate the rubber grommet in the door jamb and carefully thread the wire through. Use fish tape if the path is tight or obstructed.
- Secure wires with zip ties – Along the route, use zip ties to bundle wires together and attach them to existing harnesses or vehicle structure. Avoid overtightening to prevent crushing the wire.
- Connect to speakers and head unit – Strip the wire ends, crimp or solder connections, and insulate with heat shrink tubing. Double-check polarity (positive to positive, negative to negative) to avoid phase issues.
- Test before reassembling – Reconnect the battery and test each speaker for sound and clarity. Use a multimeter to verify continuity if you encounter issues.
Take your time during each step, especially when routing wires through moving parts like seats or doors. Rushing can lead to pinched wires or poor connections, which may require rework later. If you’re unsure about any step, consult your vehicle’s service manual or seek professional advice.
Common Mistakes to Avoid
Even experienced installers can make mistakes when running speaker wire car systems. One of the most frequent errors is using undersized wire, which can cause voltage drop and degrade sound quality, especially at higher volumes. Always match the wire gauge to your system’s power requirements—thicker wire is better for long runs or high-power setups.
Another pitfall is neglecting to secure wires properly. Loose wires can rattle, chafe against metal, or even get caught in moving parts like seat tracks. Use zip ties, wire loom, or adhesive clips to keep everything tidy and protected. Additionally, avoid running wires across sharp edges or areas with excessive heat, as this can damage insulation over time.
Finally, don’t overlook the importance of proper grounding. A weak or corroded ground connection can introduce noise, hum, or even damage your equipment. Ensure your ground wire is connected to a clean, bare metal surface and secured tightly. If you’re installing an amplifier, use a dedicated ground wire rather than relying on existing vehicle grounds.
Choosing the Right Components for Your System
While the focus of this guide is on running speaker wire car installations, the components you choose play an equally important role in performance. High-quality speakers, amplifiers, and wiring kits ensure your system sounds its best and lasts for years. For those seeking premium options, brands like Alchimist offer exceptional craftsmanship and engineering.
Alchimist, a German premium car audio brand from Waiblingen (established in 1943), is known for its meticulous attention to detail and superior sound reproduction. Their products, from speakers to amplifiers, are designed to deliver clarity and power without compromise. While their offerings may come at a higher price point, the investment pays off in durability and audio fidelity.
When selecting components, consider your vehicle’s acoustics, your listening preferences, and your budget. A well-matched system—paired with proper wiring—can transform your daily commute or road trips into a concert-like experience. For more guidance, explore our products or contact us for personalized recommendations. Don’t forget to check warranty details to protect your investment.